Sunday, 6 December 2015

DIY - Babe alert

So my latest DIY project has been nine months in the making. Made with some serious TLC and a little help from one doting Dad. This project has kept us busy but has been a labour of love in the most literal sense and a cherished creation that grew patiently and serenely while we were dealing with the frenzy of knocking down our house, moving to the rental, creating and designing our home, watching our house come together, moving out of the rental and setting up our home. All in the nick of time! (This was in addition to the daily grind of work, kinder, childcare etc.) It's been a crazy, wonderful, exhausting, exhilarating, intense time.

Seven weeks ago our treasured project was complete and made her entry with just a little fuss but well worth it! Our whimsical Willow was welcomed into the world, a delicious sumo babe weighing a whopping 8lb 12oz with a head of hair to make any grown man envious. Our clan of five is complete & the older two have embraced their sister with complete devotion. I am feeling incredibly blessed as I savour the indulgence of new born snuggles in our sparkling new home.

Emerging from the bubble that is life with a newborn and adjusting once again to being a zombie Mum, I am keen to get back on-board and continue the joy of writing my blog and sharing the interior spaces and creative projects I am creating. I feel I have a bit to catch you up on and a lot of promises previously made to fulfil. You may need to be patient with my sleep deprived and addled brain as well as tolerant of the typos that come with one handed typing as I have a babe in arms.


My treasures & greatest achievements

Saturday, 10 October 2015

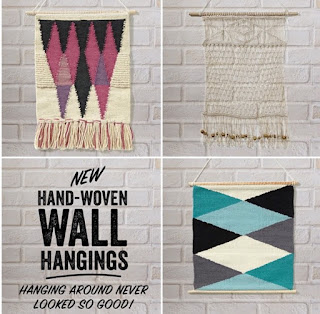
Wow-ven wall hangings!

As we settle into our beautiful new abode and wait the arrival of our little cherub I have found me some nesting time. And fortunately I have a whole brand spanking new house ripe for nesting. One of the features of our new house is an abundance of grey wall space that is screaming for some wall couture to make them shine. However it's a brave and bold step to hang something onto the wall of a new house and one I really want to get right. 

I have had some insta-inspiration and wanted to share the latest prettiness for those blank wall spaces for both adult and child spaces alike. 
 
Photo credit: @warpedthreads
 
What I love most about Instagram and the talented folk out there is the resurgence of handmade crafts of old made with skill and love. The latest trend of hand woven wall hangings  has put a modern spin on the art of weaving.
 
I am amazed at the beauty and diversity of the wall hangings that are around. The variety of different materials, knots, patterns and colors that are available and make these beauties suitable for any space. 
 
Photo credit: Maryannemoodie
 
As usual I have selected a few of my insta faves to bring you a collection to treat your eyes. 
 
 
My favourite colours by @warpedthreads Courtney and Nicky offer beginner workshops too.


Love the softness of this custom made weave by @maypoledesign
Shop: maypoledesign.weebly.com


How pretty is Peyton by @wovenbysarajo
 Custom orders: sgiansiracusa@hotmail.com


Pink, grey, white and pom pom perfection by @missmaramakes


The aptly named Ballerina by @wallcouture
Shop:www.etsy.com/no-en/shop/WallCoutureAustralia


The clever ladies @winniedotlabel and @maypoledesign collaborated to create these beauties.
 
The hand-woven wall hangings have even made the big guys sit up and take notice, with companies such as Typo stocking their own collection. 


As I do love a good DIY challenge I endeavour to have a go at making my own weave so keep an eye out for it in the future. Meanwhile have fun deciding which wonderful weave will adorn your wall.


Friday, 11 September 2015

Celestial styling - DIY Kmart Hack

This is just a quickie to share a recent up-cycle I completed. This is my first step towards preparing the babies nursery. Pictures of the nursery will come when it is complete.
 
I bought this fine looking bargain of a marquee light from Kmart, however the black was a bit moody for the light pretty nursery look I was going for, so something had to be done.


To transform this to a prettier shade I picked up this can of spray paint from Riot Art for around $12.00.


The challenge now was to find a way to ensure the white light bulbs don't end up covered in spray paint. Enter the most unlikely craft hack ever, Water balloons!! While I would like to take credit for this act of genius, I stumbled across this in the wonderful world of Insta some months ago.


This balloon I cut too short. It needs to be cut just below the skinny point so that it sits snug around the globe like in the image below.


Looks quite pretty with all the colours!!


 Now it's time to spray.


Spray your star outside, away from anything that could get discoloured. It is advisable to wear a mask. Leave it for a day to dry properly.
 
 
Here is the outcome! Not too shabby for an afternoon's work and now the perfect temperament for the nursery. Actually, it dried a touch darker than I was going for but it will work all the same.
 
I will share this sweet celestial with you when it is sitting pretty in the nursery once I am done.


Minion Madness - DIY Minion Pinata

It's been too long between blogs thanks to the craziness that was the month of August. Shelladores moved headquarters and it was a big job which we are happily settling into now. I will share interior snaps of the new house when I have it looking pretty!

August also saw two kiddie birthdays for us to celebrate, a 2nd Peppa Pig Muddy Puddles Farm party and a 5th Minion's theme party. The latter is the reason for this DIY post (as promised).

At the time of Mr Fives birthday preparations I could not find a Minion piñata in stores despite some mediocre hunting. And a Minion piñata was a must as it had been specifically requested (demanded?) by the birthday boy. Not one to shy from a challenge I had a vision in my head of how I could pull off making one of my own and thought I would be kind enough to share (only because it worked). It was surprisingly quite easy and not too time consuming once you've got the right materials.

You will need:

  • A box of approx. 30 x 30 x 10cm. I found a sandwhich grill box which was the perfect size.
  • Yellow streamer ribbon - This can be bought from most cheap goodies shops.
  • Glue - I used craft glue and a glue stick
  • Sticky tape
  • 5 sheets of yellow paper
  • 1 sheet of black paper
  • Minions eye goggle mask & mouth print out - I found one through a google search, printed & coloured in.
  • Lollies - a selection of your sweetest choice
  • Strong string or thin rope


Step 1 - Poke a hole for the rope to go through at what will be the head of your box. Leave top flap of box ajar but ensure the bottom of your box is secure.

Step 2 - Cover the box in yellow paper - this is to stop any box appearing should I leave gaps


Step 3 - Measure the length of your box with yellow streamer and cut as many lengths as you will need. I cut my length to go over one front and side. I did 20 lengths at a time. Approximately 50 lengths was needed for one side.


Step 4 - Fringe your streamer using scissors. The streamer is so fine that you can layer and cut multiple streamer lengths at a time. I was fringing up to 15 lengths at a time.


Step 5 - Paste glue over the box and stick streamer one layer at a time just on the top edge so the fringing hangs down and overlaps the layer below. Start from the bottom of the box and work your way up. As the streamer is fine it is easy to tear once glue is applied. Trim of any overhang from the strips. Keep one fringed streamer length for sealing the box at the end.


 Step 6 - Turn over box and repeat Steps 3 - 5 for the reverse side.

Step 7 - Cut and paste the Minion goggle eyes and mouth that you printed out. Use two black strips of paper to make the straps on the goggle. Cut out four matchstick sized pieces of black paper and glue on top of the box as the Minion's hair.

Step 8- Using yellow card cut two even strips of approx. 4cm wide. Fan fold the strips the entire length. These will be the arms for your minion.
 

Step 9 - Cut out two small black hands that are in proportion to arm size. Adhere to the yellow arms and attach arms to the sides of the box. I required tape for this to ensure they will stay.


Step 10 - Poke through your string or rope ensuring you have enough length to tie your piñata.

Step 11 - Fill your piñata with some sugary goodness. I go for wrapped lollies as the idea of collecting them unwrapped from the floor doesn't bode well with me. Kmart has a good selection.


Step 12 - Seal your piñata well and cover the seal with your spare piece of streamer for a seamless finish.


Step 13 - Stand back and admire your handiwork.
 

Step 14 - Hang your piñata, assemble the Minions and let them wack away watching at your precious creation gets decimated all in the spirit of good fun.


 Note: My box was a little too strong so if you have a thicker box it might be an idea to poke a few holes to help the destruction underway.
 
Finally here is my attempt at a minion cakes for you to have a giggle at, I'll stick to Pinata making.

Thursday, 30 July 2015

Blush crush!

I am having a blush crush that rivals my copper crush. This crush is highlighted by two exciting, major life events that we are enjoying at the moment. The first, our third lil' bundle of joy growing within me and the second the building of our brand spanking new home is complete.

The precious little bundle growing within me is a girl. While we wouldn't have minded either way I am very pleased to give Amelia a sister to treasure. Now I have a sweet, girly nursery to create and naturally that involves lots of planning of pink perfection!

The new house is officially ours in 1 week. (Yippee! ) And it is styled in subtle, neutral greys and whites. I have been doing some serious splurging on feature items for the house which include a few pink items for that pop of colour. Not surprising seeings how well pink goes with grey and white.

@littlerosieandme perfect pink, grey and white combination
www.littlerosieandme.com

I have been having so much fun putting together flatlays for the new rooms in the house which all include a pop of pink. I will be sharing these in future posts.

So this partiality for pink is emerging a bona fide blush crush.

Here are some of the instagram faves currently that make me blush:

www.rawluxe.com.au

Diamonds are a girls best friend and @rawluxeinteriors have created a gem with the #fentydiamond which looks perfect in pink.
 
allieandthebear.bigcartel.com

 @allieandthebear are hooked on the pink, grey and white combination with their stylish feature wall hooks. Pretty enough on their own or sweet for enhancing a display.


thedustypoppy.bigcartel.com

 @Thedustypoppy has the blush crush sussed. Look at these devine items which include goodies by Bloomingville general ecletic and @Prettytidy_roshnee. Two of these beauties will be proudly on display in the new pad.
 
 
summerandwillow.bigcartel.com Photo credit to @myhandsome
 @summerandwillow create a pretty in pink print that would sweeten any space. Perfect for a little girls nursery perhaps?!.


 This goddess of a chair by @Barnaby_lane could seduce any room with it's blush class.

The Langham have long knowing a good thing with their classic blush and gold colours and I have a long love affair with the Langham. What's not to love? They do style and luxury with the ultimate class.


The Langham Colours - Photo credit @shelladores
 
I look forward to sharing and styling the new house with items that will make us flush with blush. I wonder what the next flavour to crush on will be. Hopefully something that compliments blush perfectly.  
 
A sample of my blush goodies.


Til next time...


Monday, 20 July 2015

Banner bling - DIY

Today's DIY project follows my usual penchant for creating easy, no fuss and effective interior styling's. Wall banners are a brilliant way of adding bling to your wall using colour and personality. Creating your own banner means personalising to whatever style suits your kidlets.This is why we are creating one today and us a bonus there's no sewing required.

 Here's what you'll need:

  • Dowel - I picked up a  metre length stick from Bunnings for around $3 which was enough for making 3 banners.
  • Calico - a metres length. This the material of my choice however there are a few options that would be suitable.
  • Buttons - these will be used for the feature design on my banner. Purchased from e-bay.
  • Pom-pom string - my border of choice, purchased from Lincraft.
  • String or ribbon - to use for hanging.
  • Pencil or craft chalk - for marking out lines.
  • Scissors
  • Stanley Knife
  • Craft glue


Here's what to do:

Step 1 - Mark and cut out cloth to the banner size of your choice allowing for a 3cm space at the top to wrap around the dowel. My banner size is 15cm x 20cm.


Step 2 - Use the cloth cut-out to measure the length of dowel you require. Allow for 2cm overhang on either end of the banner. Cut with stanley knife.


Step 3 - Create your banner design. I am using wooden patterned buttons in the shape of a heart as a feature. These are glued on using craft glue. Leave to dry before completing step four.


Step 4 - Glue the 3cm overhang of the banner to the dowel at the top.


Step 5 - Measure the length of the Pom-pom string you require, cut and glue using craft glue. Leave to dry.


Step 6 - Measure the length of string your require for hanging your banner by doubling the length of the dowel you are using. Wrap string around twice on either end and tie together in a knot at the back.

Step 7 - Hang your banner in a place where it can bring a touch of bling to a much needed wall space!

Here's how it turned out!!!


I love this hanging in my little girl's room.


Not to be left out (and rightly so) my four year old son asked where his banner was. Here's what we whipped up for him using a design of his choice.


Inspired by my post??? I would love to see your own banner creations tag me on instagram.

You can WIN one of these two banners for your self. See my instagram post for details for how to win via @shelladores.

I welcome any questions and comments. Thank you!

See you next time...